Remove Turkey Breast and Continue Cooking
If you're cooking for 6 or fewer people this year, you might want to consider buying a bone-in turkey breast, instead of a whole turkey.
Bone-in turkey breasts are not only smaller to store in your fridge, but they cook faster and with less fuss on Thanksgiving morning. Plus, they should yield just the right amount of turkey for a smaller group, and still provide some yummy leftovers for sandwiches the next day.
Different Types of Turkey Breasts to Choose From
There are a few different types of turkey breasts to consider when deciding what would be best for the big day.
Boneless Turkey Breasts: This is the simplest route. A boneless turkey breast has the cavity and all bones removed and there are some great recipes for boneless turkey breasts, like this nice one from Butterball: Boneless Savory Herb Turkey Breast.
The Hotel Turkey Breast: This is on the other side of the spectrum. "Hotel-style" turkey breasts have whole wings attached and usually portions of the back, neck, skin, ribs, giblets, and neck, as well. This type of cut is typically found only in the Northeastern United States. The hotel-style breasts cost less per pound than the other two types and are a little bigger (7-9 pounds). They also contain some dark meat for those who like a little variety. You can also use the neck and giblets to make gravy. But the preparation is very similar to cooking a small whole turkey.
Regular Bone-In Turkey Breasts: This is the most commonly cooked turkey breast available. This cut includes the whole bone-in breast with ribs, a portion of the wing meat, and a portion of the back and neck skin. Bone-in turkey breasts are widely available and make for a simple but satisfying, smaller Thanksgiving meal.
Simple Preparation for Bone-In Turkey Breasts
What you will need:
- Roasting pan with wire rack (V-rack if you have one)
- Butter (about 2 sticks, 16 Tablespoons, or 8 ounces)
- Fresh herbs: rosemary, thyme, and sage (1 Tablespoon of each)
- Salt and pepper to taste
- ThermoWorks ChefAlarm®, DOT®, or ThermaQ®
- Thermapen®
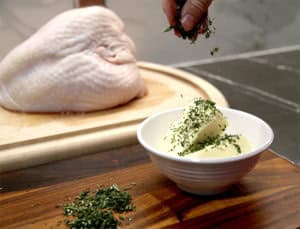
Step 1:
Let the butter soften at room temperature. While the butter is softening you can chop the herbs coarsely. Once your butter is softened, add the herbs to the butter, mixing it all up with your hands.
Step 2:
Next, separate the turkey skin from the breast, making sure not to tear the skin off the breast. Don't be scared. just get in there and pry the two apart slowly and carefully. It's not as bad as it sounds!
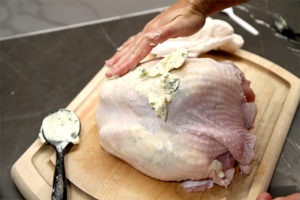
Step 3:
After the skin is loosened, scoop the butter mixture out with a spoon (as shown above), and place the spoon and butter inside the separated skin pushing the butter out with your opposite hand. (Do this on both sides.) When the desired amount of butter is under the skin of the breasts, use both hands to spread it evenly over the breast meat.

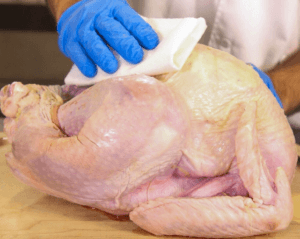
Once the inside is done, take some paper towels and pat the skin of the turkey dry. This will help the butter adhere to the outside of the skin more easily.
Spread the remaining butter over the skin and season the top with a little salt and pepper.
Thanksgiving Tip: Leave In the Pop-Up Timer
Alton Brown recommends ignoring but leaving in the pop-up timer while cooking (if your turkey breast comes with one). If you pull it out it will leave a gaping hole where juices can flow out. With white turkey breast meat being among the leanest of meats, you need to retain all the moisture you can.
Step 4:
Place your turkey on a wire rack and then place the rack in a roasting pan. Pour 1-2 cups of water in the bottom of the roasting pan. This will prevent the drippings from burning on the bottom of the pan.
If using a flat rack (use a V-rack if you have one), you will notice the turkey will tilt to one side or the other. You can find something that is oven safe to prop it up, or you can easily tilt it to the other side halfway through the browning process. Your turkey will still get a nice even brown color this way.
We also used a disposable aluminum foil roasting pan for easy clean up. (Who really likes the clean up part?)
Thanksgiving Tip: Adjust Your Oven Rack
Before placing your turkey in your oven, make sure to adjust your oven rack from its normal placement to the bottom 1/3 position in your oven. This will put the turkey in the thermal center of the oven and allow for a more even cook.
Step 5:
Set your oven to 425°F (218°C) and allow it to fully come to temperature. Place your ChefAlarm or Dot probe properly and set the alarm to sound at 160°F (71°C). Then place your turkey breast in the center of the oven and roast for 30 minutes. (Remember to tilt the turkey breast to expose the opposite breast half way through the browning process if you don't have a V-rack.)
Thanksgiving Tip: Use a Multi-Timer like the Trio
If you plan to cook the dinner sides and dessert at the same time as your turkey breast, you will want to make sure you have a ThermoWorks TimeStick Trio. This will allow you to keep track of cooking times on 3 different dishes. (No one wants burned pie crust!)
After the 30 minute browning process. Reduce your oven temperature to 325°F (163°C), and cook until your turkey reaches an internal temperature of 160°F (71°C) as measured by your ChefAlarm or Dot. (Our turkey took about an hour.) The USDA recommends that the internal temperature of turkey reach at least 165°F (74°C) for safety. But pull your turkey breast from the oven when it reaches 160°F (71°C) as it will continue to cook after you take it out of the oven. If you wait to pull the turkey at 165°F (74°C), the breasts will be overcooked and dry.
Once out of the oven, let your turkey rest for 20 minutes to bring the internal temperature up and to allow all the turkey juices to redistribute throughout the breast.

After 20 minutes, carve and serve the turkey breast. We told you it was going to be simple and easy. Cooking with ThermoWorks thermometers makes cooking fun and simple!
Additional Turkey Tips:
- Reheating leftover Turkey temps
- Easy leftover Turkey recipes

Source: https://blog.thermoworks.com/turkey/turkey-breasts-moist-juicy-turkey-breast/
0 Response to "Remove Turkey Breast and Continue Cooking"
Post a Comment